Wednesday, December 18, 2013

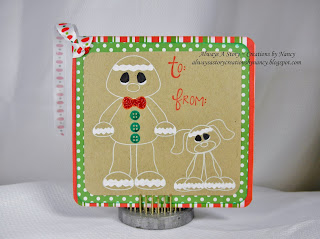
Gingerbread Sketch tag

I tried my hand at something a little different. I used an svg file and my Cameo to draw these cute little ginger's.


I set up the pieces on my page how I wanted them. Then went back and "erased" the parts I didn't want to draw, like where the arms overlapped, etc. Once I had them the way I liked I set the Cameo to draw them with a white gel pen. I'm not entirely happy with the eyes but I can try something different next time. Other than that I'm very pleased with the look. 


Materials: 
Craft paper, The Paper Studio "Christmas Basics" stack, Really Reasonable Ribbon, Scraptastical Kreations "Gingerly Love" file (dad and dog), Unity Stamps "Tags, Glorious Tags" (to, from), white, red and green Gelly Roll Pens, red Stickles. The writing tool I use is from Hot Paws Creations.

Thanks for stopping by, I hope I've given you some inspiration! :)


Friday, December 13, 2013

Snowman and Rudolph Cookie Pops

Just finished up some cookie pops for a cookie exchange. I thought these might be something fun and different.

First up are the snowman cookies. I used Double Stuf Holiday Oreos, covered in Ghirardelli white chocolate. The eyes are Wiltons candy eyes, red licorice shoelaces and m&m's for the earmuffs. An orange TicTac nose and licorice shoelace for the mouth.


The Rudolph pops are the same Oreos covered in milk chocolate with mini pretzels cut in half (a real pain in the butt to do!), Wilton candy eyes, a mini Rolo and mini red m&m for the muzzle and nose. My son is the official taste tester and said these were "Oh my God delicious", lol.


Thanks for stopping by, hope I've inspired you to make something fun out of your cookies. ;)

Friday, December 6, 2013

I'm having a Give-AWAY!

It's the holidays and we could all use a chance to win something pretty, right? In the hopes of gaining some new "likes" to my Facebook page: Always A Story ~ Creations by Nancy and some interest in my Etsy store by the same name, I'm giving away this pretty bracelet to one lucky lady (or fella).  

It's a 5 strand black waxed linen bracelet with red cat's eye beads, red Swarovski crystals and assorted pewter beads. Approx 7 1/2" long  with a lobster claw clasp.


Here it is on my wrist to give you an idea of how it may look on your wrist ;)

What do you need to do to win this baby? Just share the post from my Facebook page to your wall, or in any group you belong to, for everyone who comes and likes my page and says you sent them you get another entry. Pin the bracelet pic on Pinterest and let me know for another entry.

This giveaway will be open through Friday December 20, I'll post the lucky winner to my Facebook page on Sat. December 21.

As a thank you for helping me spread the word I'm having a 20% off sale on everything in my Etsy store through December 25 using code Christmas20.
Thank you!

Share, share away! Merry Christmas!


Christmas Earrings

Christmas is right around the corner and I've designed some really cute and fun Christmas earrings that you can find in my Etsy store: Always A Story ~ Creations by Nancy.


Thanks for stopping by today! Merry Christmas!


Wednesday, October 30, 2013

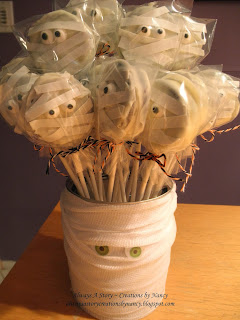
MUMMY POPS

It's been a while since I've updated my blog, and what better way than to show you how I've made these adorable Mummy Pops. I made a bunch for a bake sale at school and they were such a hit I got a couple of orders for them. So the second go-around at making them I made 4 dozen instead of the 2 dozen the first time and I learned a few things along the way. Be sure to read all the way down to the bottom for some helpful tips ;)


What you'll need:

Double Stuf Oreos 
Lollipop Sticks
White chocolate melting wafers
Candy eyes
Wilton white sugar sheets
Small goodie bags
Twine or curling ribbon
spoon and spreader
cookie sheet lined with wax paper


Layout all of your supplies because you'll be working in small batches since the chocolate starts to harden fairly quickly. Cut your sugar paper into strips about 1/4" wide. I used freshly washed (and dried) scissors. Push the sticks into the cookies GENTLY but firmly holding both sides, about 1/4 of the way in. I melted the chocolate in small batches in the microwave, about 30 seconds at a time, stir until you get a nice smooth consistency. Hold your cookie over your bowl and pour some chocolate over the cookie, turning, twisting, pouring making sure to get in between the cookie and both sides. Lay the cookie on the wax paper. I do 2-3 cookies at a time with chocolate, then decorate.
Put the eyes on first, push into the chocolate, then lay the sugar strips zig-zag across for the mummy effect. I lay it on then cut the strip to fit as I go. Once your tray is full, let sit to harden or pop in the frig to speed it up. 
Once the chocolate has dried it's time to bag 'em up. Tie them with some twine of curling ribbon and voila, you're done!!


What I've learned:
1. Ghirardelli white chocolate melts the best, tastes better and goes farther than the Wilton brand. AND you can buy it in the grocery store.
2. My Walmart carries Wilton brand supplies in the specialty baking section, it's where I found the sticks, small goodie bags, sugar sheets and eyes.
3. The fresher your cookies are the softer the cream filling and the better the cookies stay on the stick while you're trying to chocolate them up. Since Oreo's have an undeterminable shelf-life (not really but let's face it, there's enough preservatives that they can make these a year in advance) I found it's best to buy the holiday themed cookies. I used them for the first batch and beside looking cool with the orange filling when bit into, they were definitely much fresher than the regular Double Stuf I bought on Monday. I had way more cookies falling apart this go-round. 
4. When your cookie falls apart all is not lost! Just get one side chocolated up, lay it on the sheet on put the other side on top and smear some chocolate around to finish it up.
5. Make sure to have a glob of chocolate around the stick where it meets the cookie. This will hold it on once dried. 
6. If your cookie looks a mess, it's ok, you're putting eyes and a strip on it which should cover most of the mess, and once they get into those little hands it will be devoured so quickly little Johnny won't have time to say "hey, your chocolate looks like it was spread on more evenly than mine".
7. It's REALLY hard to resist licking your fingers while doing this (well, for me anyway) so have some wet paper towels handy for wiping.
8. These can be time consuming and frustrating for those who are craftily challenged. I'm not saying they are hard, not at all, I actually found them quite easy, but hey that's me...I'm quite a crafty gal ;)
9. The cost is approx. $15 per 2 dozen.

Have fun and I hope your little ghouls and goblins enjoy devouring your mummy pops, should you be brave enough to try your hand at them. And hopefully they give you one "ooo" or "aaaaah, how cool" before they disappear! 

Happy Halloween!!


Friday, August 9, 2013

Birthday Blog Hop

Hello - and welcome to our Birthday Blog Hop, where you will see all things related to birthdays today!  With Lynda's birthday being the 2nd of month - and Deborah's the 14th - we decided to do a fun hop to celebrate our special days!  Only with this party - you don't have to bring a gift! 
So, lets get started!!!  If you are here from Carla's blog then you are in the right place, but if you have just showed up here at my blog - make sure you go to the beginning at Lynda's blog because it's always best to start at the first of the hop for all the GREAT ideas you will end up seeing! 


 Here's our line-up should you lose your way:
2. Miranda - www.nanasscrapspot.com 
7.  Christine - http://hotberrydesigns.blogspot.com/ (YOU ARE HERE NEXT)

Now for my idea...  

First I have a digital invitation to share. I created it on my computer for my husbands 50th Surprise Party. I sent it off to Costco Photo online and had it printed as a photo greeting card ($14.99 for 50 with envelopes!!) and picked them up in store the next morning. can't beat that!
Pardon the mess at the bottom but I blocked out my personal info.
And I also have a cute little card to share. For the background I used a Darice embossing folder, some Really Reasonable Ribbon and jazzed it up with a little stick pin. The sentiment is a stamp from Gina K. designs.


Now for the fun part - the blog candy...  One lucky winner will receive a box of scrapbooking goodies donated by Deborah!!!  To be eligible for the drawing you must: 
  1. Leave a comment on each of the blogs with a contact email address for us to contact the winner!
  2. Extra entry for sharing this hop and giveaway on your Facebook page, Twitter feed, or blog!
  3. "Like" Lisa on Facebook at - https://www.facebook.com/pages/Scrapping-With-Lisa-Designs/1308820602688423.
  4. "Like" Lynda on Facebook at - https://www.facebook.com/Memoriesintyme?ref=hl 
We hope you were able to get lots of great ideas through out this hop, and thank you for coming!  Make sure you leave a comment here - with your contact information for us to contact the lucky winner!   The "challenge" for the month - create any "birthday" related card, layout or gift made out of paper and share the link here with us.  The team will pick our favorite project out - and also send them a scrapbook goodie package!  Links can be to your Facebook page, your blog, or your favorite place to showcase your layouts!  Projects can be digitally done as well!  

Thanks for stopping by today, I hope we've inspired you in some way!
Happy Birthday Lynda and Deborah! :)

Monday, July 29, 2013

Unity Color Challenge

Ok, so I missed the deadline to enter but honestly, I'm just happy to be creating again.


Unity Stamp Company posted this pretty free digi to use in their coloring contest. Of course I went with purples (I'm a purple freak in case you didn't know) and colored using Prisma pencils. Then the image sat for a couple of days. I came across a 6x6 stack at Michael's called Violet Leaf by DCWV. I had just cleaned them out of their purples and teals in cardstock so I knew I had to have this pack. And to my surprise as I was flipping through the stack I noticed some papers that worked well with my colors. Funny sometimes how things come together. I printed 2 images and fussy cut around the flowers and leaves that were colored, then "popped" them onto the black and white image. I added just a bit of color around the flowers for depth. The butterfly is Recollections, Michaels had a bunch of different packs on clearance for $1, love when I find things I love on clearance!

Thanks for stopping by today. I hope I've inspired you in some way, as I was inspired by all of the amazing projects submitted at Unity. And some Pinterest inspiration for the design. :)

Saturday, July 27, 2013

A DIY project...

Hey there! I've been taking it easy this summer with the paper projects and trying to get some things done around the house. It seems that every room in the house has projects I want to work on (thanks Pinterest). One that we recently worked on (notice I didn't say completed) is the hot tub room. I found these really neat rubber tiles at BJ's, we've been trying to find something we liked for years and I came across these a few months ago.

Thank goodness for a handy husband, he installed these which was really easy, mostly because I had nothing to do with it, but they are just laid down over the concrete and some were cut to fill in on the edges and around the tub.

I took to repainting the table and chair set that was rusting away in the corner, it badly needed a facelift so fun and funky was my goal.

Here's what the set looked like before we funkafied it. Verdigris with plain ol' white cushions. A bit outdated I'd say.

Here's my helper and favorite son (BTW, I only have one) putting a coat of spray on one of the chairs.

And tada, here it is all done! It's hard to tell but the base of the table is purple. I even whipped together the arrangement with some silk flowers and a glass vase I picked up at Hobby Lobby.

Here' a close-up of the teal chair with the funky reupholstery. I found this fabric at Hobby Lobby, it's a waterproof vinyl, perfect for a wet-from-the-tub-bottom to sit on ;)

With the confined space we decided to only put 3 of the chairs around the table. The back on the green chair was broken anyway so we decided to try something a little different and hang it on the wall as a towel rack.

My thoughts were to hang the chair against the wall sideways with the legs facing to the right. This way was my husbands idea and it works well for a towel rack, and also as an eye piercing head thumping tool, as he's found out twice now. I've since put rubber feets on the bottoms to cushion the blow.


I'm really pleased with how it all turned out, very fun and funky for sure. There are still a few small projects to finish in this space before I can call this room complete but tomorrow is another day and another chance to be productive! Thanks for spending a few minutes of your day with me today. :)


Friday, June 7, 2013

If you're looking for the Summer Blog Hop Click Here or scroll down (you'll see some awesomeness on the way)

Pinterest Inspired Hop


Welcome to the Pinterest Inspired Hop where we are sure to delight you with fabulous creations. My favorite pictures to oogle over are of perfect yards with fun decorations, and amazing photos of glorious kitchens, then I just look around and sigh, lol. I'd love for my house to be Pinterest-envy worthy and maybe one day room-by-room, project-by-project it will :) Until then I will keep pinning!

If you are here from Deborah's blog then you're in the right place. If you just came upon this hop by chance today, start back at Deb's because you're not going to want to miss a thing!! (she also has some fab candy!!)

For my project I made a garden pot sculpture, I'm sure some of you have seen this. You know those painted pots that stack on top of each other and seem to defy gravity. Even my husband had doubts I could pull it off, has he not learned the power of a woman determined????? Honestly, it wasn't hard at all, I even enlisted his help to finish pounding the rod into the ground for me :) Here it is step by step:
 First "we" pounded the rod into the ground. I chose this spot to hide the line where the 2 bamboo screens meet. The screens help hide my neighbors unsightly yard since we spend so much time out here in the summer.

Next, I slid the first pot down, filled with soil and plants.


Then I worked pot by pot, sliding down, leaning to the side the the other side, adding soil and plants.


We probably could have pounded that rod down a bit more but I planned for this when I picked out my plants....

Here it is all done, pots & plants.

See how that spike plant hides the top of the metal rod, ah, I was using my noggin.

And tada, the finished project, all pretty with happy plants and a fresh bed of mulch. I completed this project a while ago since I knew we were expecting the giant cicada invasion of 2013. Don't have them in your neighborhood? Check out my video so you can enjoy these amazing and disgusting creatures of nature.
Materials: Home Depot ~ 6 ft square metal rod, 5 clay pots, 1 larger clay pot, assorted plants. Turquoise and Purple acrylic paint. Potting soil. Black mulch. I meant to spray the pots inside and out with a clear acrylic coat but I was so anxious to start putting in together I forgot this step!

Here's the full hop line-up:
Deborah ~ http://www.scrappingmamma.net/
Nancy ~ **you are here**
Inga ~ http://mommahobbit.blogspot.ca/ **your next stop**
Robin ~ http://create-a-latte.blogspot.com/
Lissa ~ http://www.somanycrafts.com/
Lori ~ http://www.scrappinmystressaway.blogspot.com/
Jessie ~ http://edoggsugarlipsandprincessbuttercup.blogspot.com/
Miranda ~ http://www.nanasscrapspot.com/

I hope we've inspired you to try your hand at something fun and creative for yourself!! You can find me on Pinterest here and Facebook here. Head on over to Inga for some more awesomeness. Thanks for hopping with us today!