Saturday, July 27, 2013

A DIY project...

Hey there! I've been taking it easy this summer with the paper projects and trying to get some things done around the house. It seems that every room in the house has projects I want to work on (thanks Pinterest). One that we recently worked on (notice I didn't say completed) is the hot tub room. I found these really neat rubber tiles at BJ's, we've been trying to find something we liked for years and I came across these a few months ago.

Thank goodness for a handy husband, he installed these which was really easy, mostly because I had nothing to do with it, but they are just laid down over the concrete and some were cut to fill in on the edges and around the tub.

I took to repainting the table and chair set that was rusting away in the corner, it badly needed a facelift so fun and funky was my goal.

Here's what the set looked like before we funkafied it. Verdigris with plain ol' white cushions. A bit outdated I'd say.

Here's my helper and favorite son (BTW, I only have one) putting a coat of spray on one of the chairs.

And tada, here it is all done! It's hard to tell but the base of the table is purple. I even whipped together the arrangement with some silk flowers and a glass vase I picked up at Hobby Lobby.

Here' a close-up of the teal chair with the funky reupholstery. I found this fabric at Hobby Lobby, it's a waterproof vinyl, perfect for a wet-from-the-tub-bottom to sit on ;)

With the confined space we decided to only put 3 of the chairs around the table. The back on the green chair was broken anyway so we decided to try something a little different and hang it on the wall as a towel rack.

My thoughts were to hang the chair against the wall sideways with the legs facing to the right. This way was my husbands idea and it works well for a towel rack, and also as an eye piercing head thumping tool, as he's found out twice now. I've since put rubber feets on the bottoms to cushion the blow.


I'm really pleased with how it all turned out, very fun and funky for sure. There are still a few small projects to finish in this space before I can call this room complete but tomorrow is another day and another chance to be productive! Thanks for spending a few minutes of your day with me today. :)


Friday, June 7, 2013

If you're looking for the Summer Blog Hop Click Here or scroll down (you'll see some awesomeness on the way)

Pinterest Inspired Hop


Welcome to the Pinterest Inspired Hop where we are sure to delight you with fabulous creations. My favorite pictures to oogle over are of perfect yards with fun decorations, and amazing photos of glorious kitchens, then I just look around and sigh, lol. I'd love for my house to be Pinterest-envy worthy and maybe one day room-by-room, project-by-project it will :) Until then I will keep pinning!

If you are here from Deborah's blog then you're in the right place. If you just came upon this hop by chance today, start back at Deb's because you're not going to want to miss a thing!! (she also has some fab candy!!)

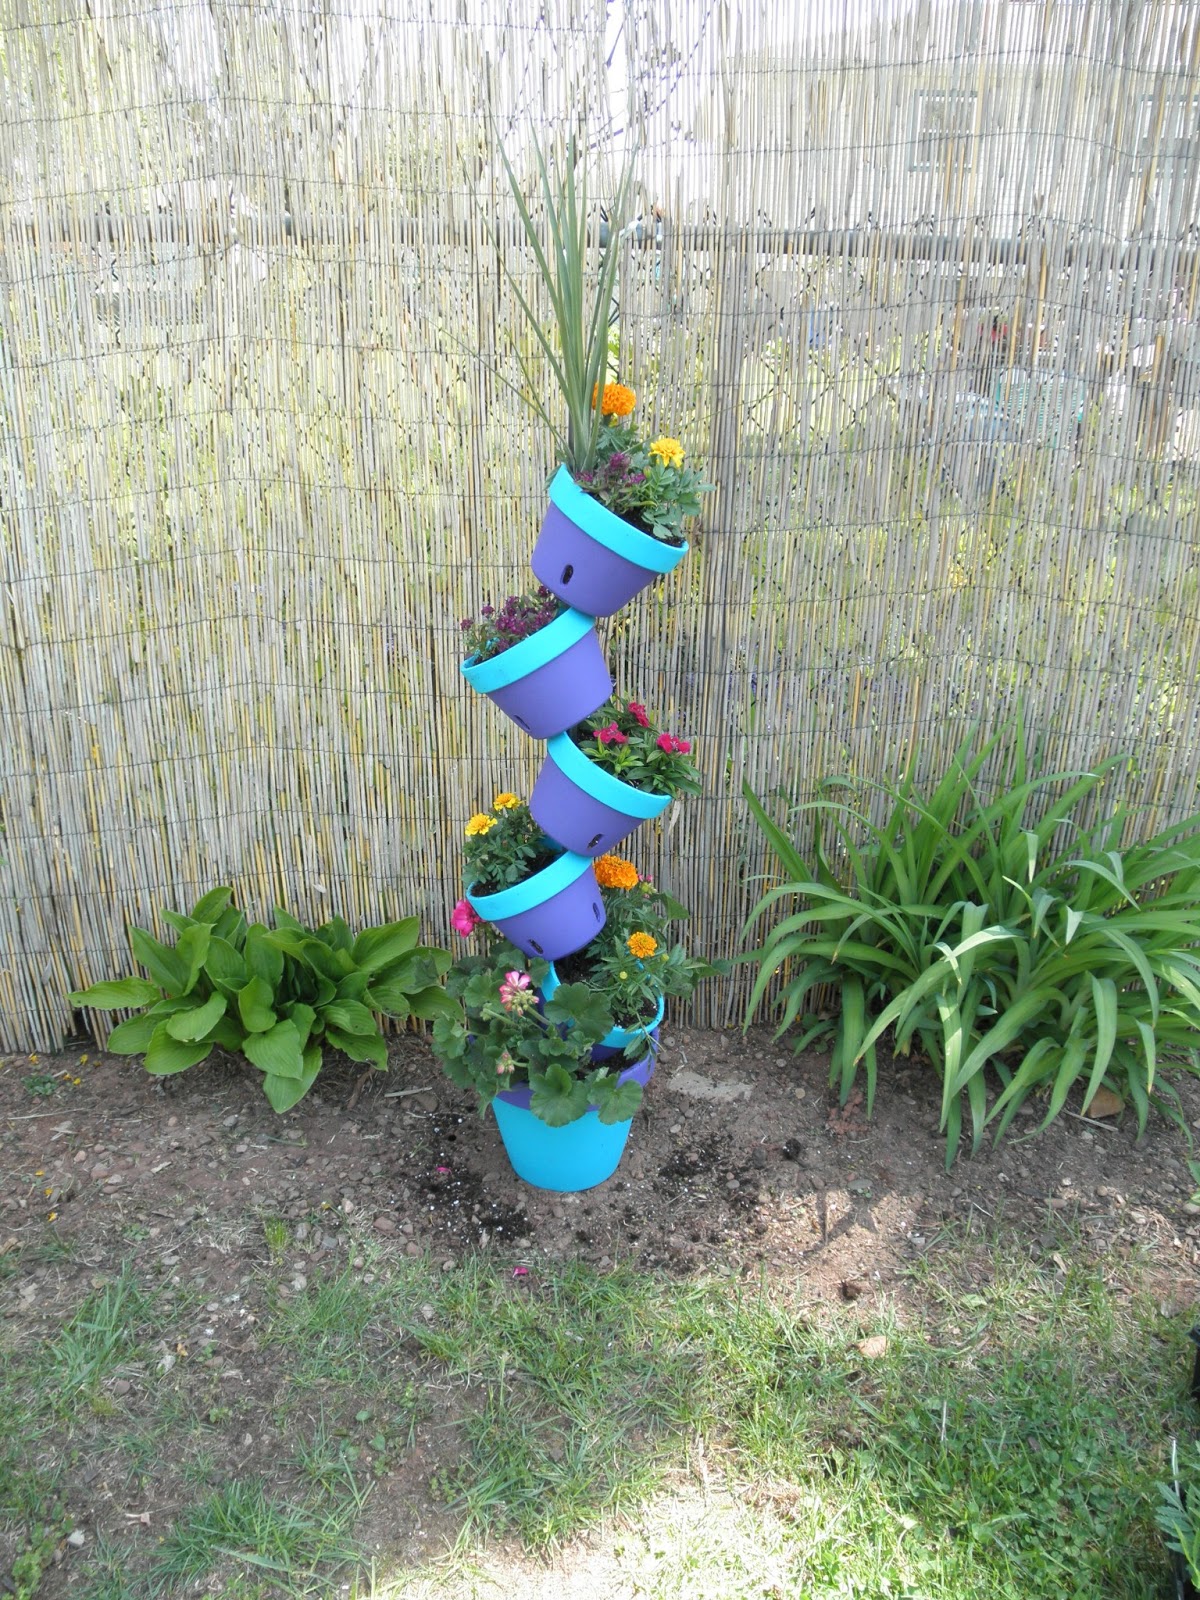
For my project I made a garden pot sculpture, I'm sure some of you have seen this. You know those painted pots that stack on top of each other and seem to defy gravity. Even my husband had doubts I could pull it off, has he not learned the power of a woman determined????? Honestly, it wasn't hard at all, I even enlisted his help to finish pounding the rod into the ground for me :) Here it is step by step:
 First "we" pounded the rod into the ground. I chose this spot to hide the line where the 2 bamboo screens meet. The screens help hide my neighbors unsightly yard since we spend so much time out here in the summer.

Next, I slid the first pot down, filled with soil and plants.


Then I worked pot by pot, sliding down, leaning to the side the the other side, adding soil and plants.


We probably could have pounded that rod down a bit more but I planned for this when I picked out my plants....

Here it is all done, pots & plants.

See how that spike plant hides the top of the metal rod, ah, I was using my noggin.

And tada, the finished project, all pretty with happy plants and a fresh bed of mulch. I completed this project a while ago since I knew we were expecting the giant cicada invasion of 2013. Don't have them in your neighborhood? Check out my video so you can enjoy these amazing and disgusting creatures of nature.
Materials: Home Depot ~ 6 ft square metal rod, 5 clay pots, 1 larger clay pot, assorted plants. Turquoise and Purple acrylic paint. Potting soil. Black mulch. I meant to spray the pots inside and out with a clear acrylic coat but I was so anxious to start putting in together I forgot this step!

Here's the full hop line-up:
Deborah ~ http://www.scrappingmamma.net/
Nancy ~ **you are here**
Inga ~ http://mommahobbit.blogspot.ca/ **your next stop**
Robin ~ http://create-a-latte.blogspot.com/
Lissa ~ http://www.somanycrafts.com/
Lori ~ http://www.scrappinmystressaway.blogspot.com/
Jessie ~ http://edoggsugarlipsandprincessbuttercup.blogspot.com/
Miranda ~ http://www.nanasscrapspot.com/

I hope we've inspired you to try your hand at something fun and creative for yourself!! You can find me on Pinterest here and Facebook here. Head on over to Inga for some more awesomeness. Thanks for hopping with us today!

Summery Blog Hop

 Welcome to the Summery Blog Hop!! We hope to dazzle you today with some fun and awesome summery projects! If you've happened upon my blog today head over to Suzanne's blog so you can hop from the beginning. If you've made your way here from Suzanne's blog then you're in the right place and carry on! Suzanne has an awesome goodie pack sponsored by Zannie Berry Scrapbooking (valued at $60, wow) for one lucky winner, check it out.

The project I have to share today is a tumbler I made for one of the teacher's in my son's school to give to her daughter's teacher, did you follow that?? :) I had made a few tumblers as teacher appreciation gifts and this teacher saw them and went wild over them, she also asked me to make 2 more . One for herself and one for her husband (she went BALLISTIC over all of these!). You can find those pictures on my FB page. She requested a summer theme for this cup so it worked in perfectly for our summery hop!


Fun stuff, right?
The tumblers I found on Amazon, the vinyl (Oracal) I bought there as well. Cutting files are a mixture of Scraptastical Kreations, Kadoodle Bug Designs and Silhouette. And of course my trusty BFF, Cameo.

Here's the complete line-up in case you lose your way:
Nancy ~ **you are here**
Jennyfer ~ http://www.scrapalajen.blogspot.com/ **up next**
Lucy ~ http://www.love2createitall.com/
Teresa ~ http://www.love2createitall.com/

I hope we've inspired you in some way today!! Thanks for hopping along with us! :)

Saturday, May 11, 2013

Friday, May 10, 2013

Birthday Cards for Ronald McDonald House

Welcome to the Birthday Cards for Ronald McDonald House Hop. For this hop we've all made cards which will be donated to RMHC for the families staying there to use. It's an amazing charity that lessens the burden for families with a sick child. These cards may be a small token but I know will be truly appreciated. Sarah will be collecting cards for the next 3 weeks to send to RMHC in Lubbock TX if you would also like to make and send a card. You can find her address and more info here.
If you've come from Jennyfer's blog then you're in the right place. If you just happened to come across my blog today you're sure to want to start at the beginning, Sarah's blog so you don't miss one thing.

There are 2 wonderful prizes for this hop. The first is some goodies from Sarah. To be eligible to win comment on each blog throughout the hop. You don't need to follow each of us but we'd love it if you did!
The second prize is a stamp set and crinkle ribbon bundle from Mae Sunshine Designs. One person chosen from all who send their cards to Sarah to receive this prize. Each card sent equals 1 entry! 

For my card I made this adorable shaped card with balloons, suitable for a boy or girl.

What did I use?
Scraptastical Kreations ~ "KISS Birthday", "Label It, Tag It, Frame It"
Peachy Keen Stamps ~ "Simple Simon"
Craft cardstock and various scraps from my stash
Twine, bling, Colorbox chalk inks, white Gelly Roll pen
Glossy Accents
HotPaws writing tool for the Cameo

Here's the complete line-up should you lose your way:

I'm your last stop on the hop today. Be sure to stop by Sarah's blog for the address and info to send your birthday cards.
I hope you've enjoyed the hop and you were inspired in some way!

Celebrate Mother's Hop


Welcome to the Celebrate Mother's Blog Hop!!!  If you are hopping along with us, then you should be here from Inga's Blog, if not, then go back to Lynda's blog at Memories in Tyme for the very beginning - you don't want to miss out on all the GREAT idea's along the way!!! 
Mothers - we all have one...or are one - they are a necessary part of our existence - and today, we celebrate THEM!  We have our own mom's, our mother-in-law's, step-mom's, surrogate mom's, our sister's who turn into a mother figure, Aunt's and Grandma's.....people who are in our lives that help us to become the women we are today - this blog hop is all in celebration of each and every one of them!!!

My project today is for my dear friend who is not only a fabulous mother to her daughter but a wonderful Godmother to my son. She loves Gerberas and I think she'll really enjoy getting these flowers and card I made from us (along with her other gift).


Close up of the card
Close up of the flowers
Materials:
Scraptastical Kreations ~ "Feeling Froggy", Elegant Florals", "Garden Splendor"
DCWV plus scraps from my stash
Colorbox chalk inks, gelly Roll white pen, Paper Studio bling, fleece, floral tape, wire
HotPaws writing tool for the Cameo

Blog hop lineup is: 

Now for the fun part - the blog candy!!!  One lucky winner will receive $20 in free patterns from Scrapping with Lisa Designs!!!  Lisa has so many awesome patterns for both card making and scrapbooking - and a design team who brings you so many different ideas each week!  I love being a part of her team, and am thankful for her for giving us this great giveaway today!!!  Now, in order to get your name in for the drawing (to be held on 5/15, so make sure you check back for the winner on Lynda's blog) you will want to do:
1.  Leave a comment on everyone's blog...  This is important as we all love nice comments on the things we have made!  
3.  "Like" Lynda's Memories in Tyme on Facebook at - https://www.facebook.com/Memoriesintyme?ref=hl

Thanks for hopping with us today! It's now time to head over to Jessie's Blog. I hope we've inspired you in some way!

Saturday, May 4, 2013

Put A Ring on It Hop

Welcome to The Put A Ring On It Hop! If you came from Nadja's blog you're in the right place. If you just happened upon my page today, start at the beginning, Melanie's Blog, so you don't miss one fabulous thing!

Since May is such a  popular month for weddings we're making projects with at LEAST 2 CIRCLES on them. Here is my project with LOTS of circles!! I thought these fun pictures of my son playing with his Sit N Spin would work very well with this theme. I love how it came out. I tried coloring in the title (one of my favorite 80's songs) with some pencils but it wasn't the look I wanted so I added some Icicle Stickles, because everything's better with Stickles. and brownies, brownies make everything better too. 

Paper is DCWV and The Paper Studio
Scraptastical Kreations cutting files "Circle Frame",
 "Element Me This"
Icicle Stickles
Hot Paws writing tool for the Cameo
Prisma Pencils
The Paper Studio bling
I'm entering this into the following challenges:
All That Stickles ~ Icicles


Here's today's lineup in case you lose your way:


Thanks for hopping along with us today! I hope you've been inspired in some way!