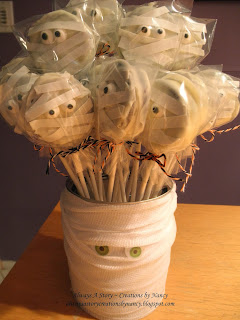
What you'll need:
Double Stuf Oreos
Lollipop Sticks
White chocolate melting wafers
Candy eyes
Wilton white sugar sheets
Small goodie bags
Twine or curling ribbon
spoon and spreader
cookie sheet lined with wax paper
Layout all of your supplies because you'll be working in small batches since the chocolate starts to harden fairly quickly. Cut your sugar paper into strips about 1/4" wide. I used freshly washed (and dried) scissors. Push the sticks into the cookies GENTLY but firmly holding both sides, about 1/4 of the way in. I melted the chocolate in small batches in the microwave, about 30 seconds at a time, stir until you get a nice smooth consistency. Hold your cookie over your bowl and pour some chocolate over the cookie, turning, twisting, pouring making sure to get in between the cookie and both sides. Lay the cookie on the wax paper. I do 2-3 cookies at a time with chocolate, then decorate.
Put the eyes on first, push into the chocolate, then lay the sugar strips zig-zag across for the mummy effect. I lay it on then cut the strip to fit as I go. Once your tray is full, let sit to harden or pop in the frig to speed it up. Once the chocolate has dried it's time to bag 'em up. Tie them with some twine of curling ribbon and voila, you're done!!
What I've learned:
1. Ghirardelli white chocolate melts the best, tastes better and goes farther than the Wilton brand. AND you can buy it in the grocery store.
2. My Walmart carries Wilton brand supplies in the specialty baking section, it's where I found the sticks, small goodie bags, sugar sheets and eyes.
3. The fresher your cookies are the softer the cream filling and the better the cookies stay on the stick while you're trying to chocolate them up. Since Oreo's have an undeterminable shelf-life (not really but let's face it, there's enough preservatives that they can make these a year in advance) I found it's best to buy the holiday themed cookies. I used them for the first batch and beside looking cool with the orange filling when bit into, they were definitely much fresher than the regular Double Stuf I bought on Monday. I had way more cookies falling apart this go-round.
4. When your cookie falls apart all is not lost! Just get one side chocolated up, lay it on the sheet on put the other side on top and smear some chocolate around to finish it up.
5. Make sure to have a glob of chocolate around the stick where it meets the cookie. This will hold it on once dried.
6. If your cookie looks a mess, it's ok, you're putting eyes and a strip on it which should cover most of the mess, and once they get into those little hands it will be devoured so quickly little Johnny won't have time to say "hey, your chocolate looks like it was spread on more evenly than mine".
7. It's REALLY hard to resist licking your fingers while doing this (well, for me anyway) so have some wet paper towels handy for wiping.
8. These can be time consuming and frustrating for those who are craftily challenged. I'm not saying they are hard, not at all, I actually found them quite easy, but hey that's me...I'm quite a crafty gal ;)
9. The cost is approx. $15 per 2 dozen.
Have fun and I hope your little ghouls and goblins enjoy devouring your mummy pops, should you be brave enough to try your hand at them. And hopefully they give you one "ooo" or "aaaaah, how cool" before they disappear!
Happy Halloween!!


